
Making Buffalo Horn Cups
By Medicine Bear
© 2019 Crazy Crow Trading Post
Making Buffalo Horn Cups
By Medicine Bear
© 2019 Crazy Crow Trading Post
Recently, I tried my hand at making my first buffalo horn cup. I say “recently”, although I first started roughing out this horn at Buffalo Days in the summer of 2003. Nevertheless, I finally decided to finish it so that I’d have one less pending project on the “back burner”! (Anybody else have this problem?)
When I say “horn cup”, I am, of course, talking about an Indian-style vessel, one which keeps the basic shape of the horn, as opposed to any kind of a white-man style mug, coffee cup, or goblet. In working on this project, I consulted with my friend Ken Smith, who is an expert Indian-style and mountain man craftsman. After finishing this horn, I discussed it with Iron Wood so as to get additional pointers on how I might add to my technique for my next horn. Both of these men make excellent horns. Thus, the following construction discussion includes insights from both Ken Smith and Iron Wood, as well as the benefits from my own experience as a rank beginner.

I’ll start at the point where I have the raw horn cap ready after removing the bone core from it. Often, the mouth of a horn will have a lot of ridge rings and rough spots on the first inch or so. It is best to remove as much of this as possible by simply cutting off the front of the horn. Some folks use a hack saw, others a coping saw or band saw.
However, when roughing out the mouth of the cup, you’ll probably want to leave on some kind of tab extension to attach a thong to for hanging. This can be a triangular-shaped tab to tie to or a rounded or square tab that you’ll drill a hole through for the thong. Note that this tab needs to be on the side of the mouth that’s toward the inside curve of the horn and not the outside. This will allow the horn to be suspended with the mouth horizontal to the ground.
Using the belt sander makes it easier to square up the mouth of the horn (or you can do it all with the rasp). If you use the sander, finish the mouth off with a rasp so that the lip cleanly meets the tab.
The next step is to clean up the rough exterior of the horn. It is agreed that the best tool for most of the work is a 4-in-1 rasp. Ken recommends first heating the horn in boiling water for no more than 10 minutes. He states that this will soften up the horn so that it is easy to quickly remove a good deal of material: NOTE: Heat is the worst enemy of a horn, whether you’re making a ladle, cup, or powder horn, so it is best to minimize any heating: better too little than too much. Otherwise, the layers of the horn will bubble up and start to separate like an old radial tire.
Both Ken and Iron Wood work the horn by holding it in their hands, that is, they don’t try to clamp it in a vice, etc. I have read an article in one of the muzzleloading magazines by a powder horn maker which described his fashioning a piece of wood into the shape of the horn core; this he clamps in his vice, then places the horn cap on it to work. This might be handy if you’re going to make a lot of cups or powder horns, although the work goes smoothly by simply holding it.
I did not heat my horn, but, rather, worked it dry, using a combination of the course, rounded part of the hand-rasp, as well as careful use of a table-top belt sander. As you work the horn, you will find a number of uneven spots, as the horn really does not have the nice curved surface that it appeared to have at first glance. I took my time, frequently feeling inside and outside of the horn between my fingers to make sure I wasn’t getting it too thin.
Incidentally, Ken mostly uses the rasp, but occasionally includes the belt sander. His sander is the hand-held type, which he mounts upside down and somewhat at an angle in a large bench vise.
After removing the bumps and ridges with the course, rounded side of the rasp, smooth the surface down with the rasp’s fine teeth. Next, it’s time for polishing. For this, you’ll use a sharp knife, piece of glass, flint, etc. Place the blade perpendicular to the length of the horn and carefully scrape the entire length. I found that, by holding the mouth against my stomach, the blade often chattered and left marks as I brought it to the mouth. I eliminated this by placing the horn on my work bench, holding it by the tip, and scraping away from me. Taking my time with scraping instead of making fast strokes actually helped me do a faster, cleaner job. Make all the scrapes in one direction, whether you scrape from tip to mouth or vice versa.

Once the surface is smooth, you can leave it this way or do more polishing. For more, you can use 320-grit sandpaper or steel wool; I chose the latter, which gave the surface a fairly shiny polish.
At this point, I chose to round the mouth of the cup. In its natural state, the mouth of the horn will usually be an uneven, oval shape; some horns are worse than others. In order to round it, I had to heat the horn. Iron Wood pointed out that buffalo horns are often much harder to heat and shape than cow horns, so he advises heating the front 2″-3″ of the horn in mineral oil, rather than water. Ken had suggested heating in water for no more than 10 minutes, which is what I did. Immediately after heating, I forced the mouth of the horn over a small metal can. You can use anything that’s round and not affected by heat, such as a glass jar, can, etc. After I had forced the horn onto the can, I put it aside to cool for a couple of hours.
After cooling, I removed the can and hit the horn again with steel wool, just to make sure I had a clean surface. The last step was to oil the horn. Ken uses rendered buffalo grease. Iron Wood suggests, in order to avoid the possibility of the grease going rancid, to use mineral oil. Rub the horn with the grease to get it all warm so that the grease/oil will absorb better. Before oiling, I hit the horn with a hair dryer at high setting, both inside and out, until the horn was quite warm. I had no trouble then with the horn absorbing the grease.
I then attached the thong to the mouth tab, added some beads, and had a finished horn.
Note: The horn I used was from an older bull, and it had a lot of big, longitudinal ridges on the inside. In order to clean these up, I used a Dremel tool, the rasp, and a crooked knife – all of which helped remove the large amount of material that constituted the ridges. I didn’t polish the inside but left it fairly smooth after finishing off with the fine teeth of the rasp.
Throughout this project, I wore heavy leather gloves whenever possible. This helped me avoid cutting myself as well as making the horn more comfortable to hold when I heated it to shape the mouth.
Making the horn cup was a lot of fun and only took a few hours (especially because I used the belt sander). I would really appreciate hearing from others who also have done horn work so that I might learn more about this fine art.
NOTE TO TRADITIONALISTS:
If you eschew the modern tools, such as rasp and belt sander, you can make your horn the old way. Get yourself a horn, some flint, and put in for a week of vacation time at your day-job. (What am I saying? REAL Traditionalists wouldn’t have a day job!)
Crazy Crow Articles

Current Crow Calls Sale
March – April
SAVE 10%-25% on popular powwow, rendezvous, historic reenactor, bead & leather crafter supplies. Save on many of our most popular items such as Colonial Clothing: Waistcoats, Knee Breeches & Frockcoat, Missouri River Deluxe Hunting Bags, Readymade Drumsticks, Powwow Drums, Hand Drum Kits, Smoked Color Buckskin, Bison Leather, Trekker Boots and other Colonial Shoes for men and women, Jingles & Lids, Stainless Steel Blades with Guards, Polished Steer Horns, Oval Chevron Beads, Lance Heads, River Cane Flute, Plains Hard Sole Moccasin Kits, Southwest Shoulder Bags, Traditional Serapes, Beaded Cinch Top Bag, Beaded Backpack & more!.


Related Products: Buffalo Horn Cups (click images to view product detail)
The following items are used in the above-article, or may provide added reference and helpful information.

Genuine Buffalo Horns (American Bison)
These high quality buffalo horns make beautiful powder horns, split horn bonnets and are great for making traditional horn spoons. On average they measure 12″-15″ around the curve, however, some buffalo horns could be smaller so if you need a specific size please note in special instructions and we will do our best to accommodate.
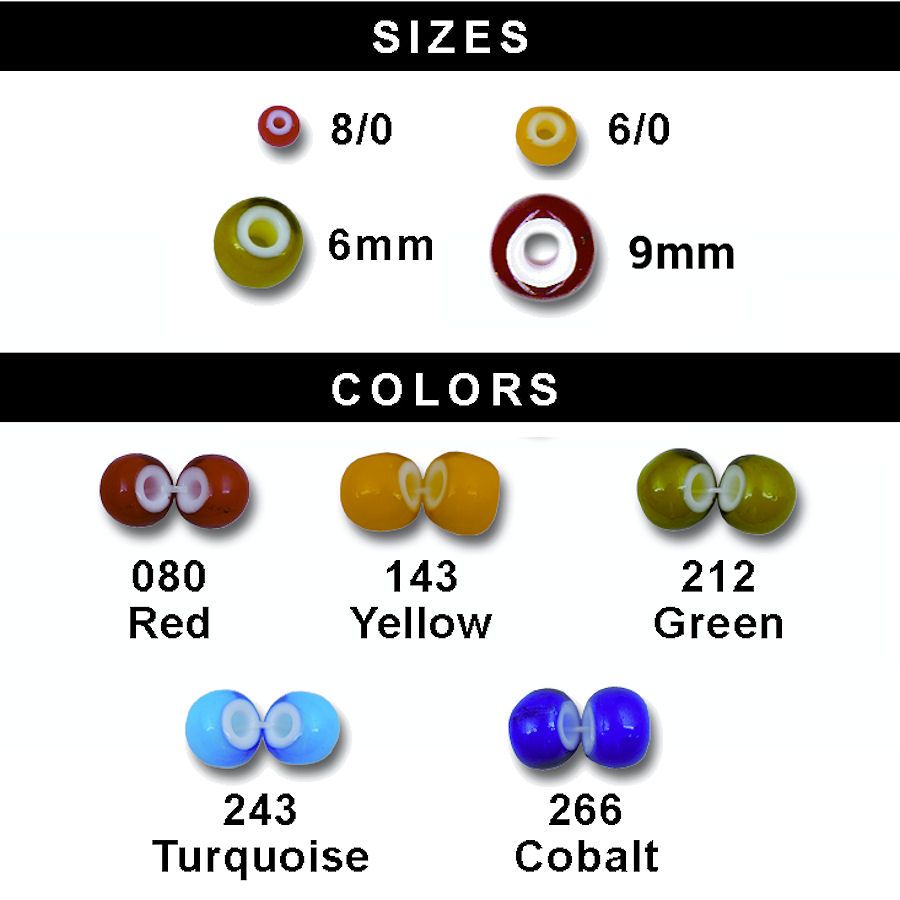
9mm Czech White Heart Beads
Also known as “Cornaline d’Allepo” beads, they were traded extensively throughout North America from the earliest times.
These beautiful Czech made beads are transparent glass over a solid white core and at present we have a good selection. Excellent for old-time beadwork, necklaces, chokers, and other déor for old-time articles.
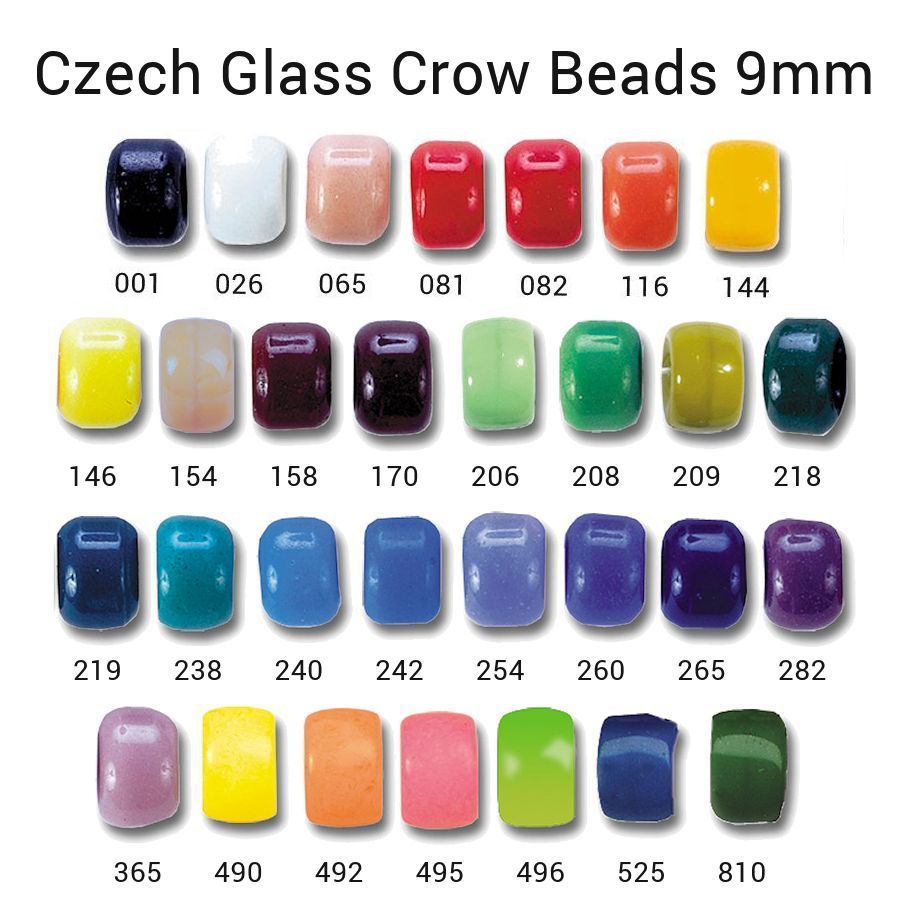
9mm Opaque Czech Glass Crow Beads
These old type necklace beads are available in 31 beautiful colors. Extremely uniform in size and shape because they are a molded glass process. Very popular style necklace bead, in part due the large hole that allows easy stringing on leather thongs.
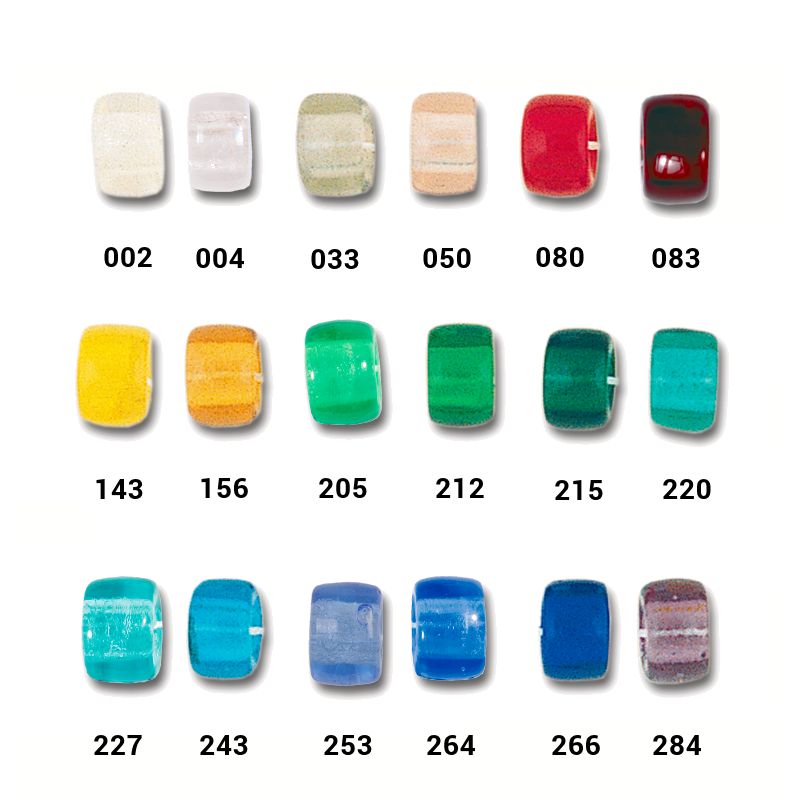
9mm Transparent Glass Crow Beads
These high quality beads are in the Czech Republic and available in a nice range of 19 vivid colors. These Transparent Glass Crow Beads are one of our most popular necklace bead styles, in part due the large hole that allows easy stringing on leather thongs.